HOW TO MAKE A FOAMCORE SOFTBOX
Directions on how to make a softbox.
Part 1. Cutting out the box itself.
Materials: One sheet of white foamcore.
Strong tape (packaging tape works best)
Tools: 1 box cutter type knife.
1 straight-edge (a T-square is almost a necessity)
1 ruler (or a T-square ruler)
1 pencil
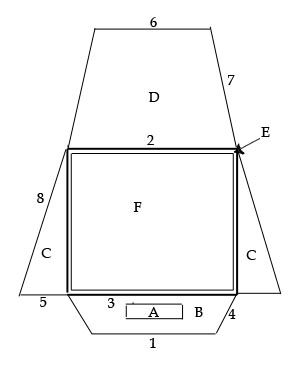
The above diagram is the basic pattern. Capital letters denominate panels (sections of the foamcore). Numbers denominate the line nearest the number.
Step 1: Determine the dimensions of panel "A." Panel "A" should be the same size of your flash head. Panel A will be cut out to make the hole to slide the softbox onto your flash. So make the hole fit your flash head snugly.
Step 2: Determine the size of the softbox. Once you have determined the dimension of Panel "A," you should decide how big you want your softbox to be. The face of the softbox will be Panel "F." This can be pretty much any dimension that you want. The one requirement is that it be wider than Panel "A."
Step 3: Determine the depth of the softbox. Panel "B" is the base of the softbox. Once the width of Panel "F" is determined (the width of Lines 2 and 3), you should determine the depth. As a basic guide, use the height of Panel "A" plus 2 inches. This will be the distance between Lines 1 and 3.
Step 4: Start drawing. Let Line 1 be on the edge of the foamcore, just mark the ends (Line 1 should be about 3 inches shorter than Line 3). Then draw Line 3 above Line 1 by the distance determined in Step 3. The length of line3 is the width of Panel "F" determined in Step 2. Center Line 3 on the foamcore to make sure there is enough room for the "wings" (the "C" panels).
Step 5: Draw Line 2 above line 3 the distance determined in Step 3 as the height of the softbox. Connect the ends of Lines 3 and 2 to make a square or rectangle (the corners should be square).
Step 6: Draw Line 6. It should be the same length as Line 1 and centered above Line 1. All lines drawn by this point should be centered.
Step 7: Connect the ends of Lines 3 and 1 with straight lines to make Line 4 (there are two lines but only one is numbered).
Step 8: Measure Line 4. Draw Line 5 (an extension on each end of Line 3). Line 5 is the same length as the length of Line 4.
Step 9: Draw straight lines from the ends of Line 5 (again, only one line 5 is numbered) to the top corner of Panel "F."
Step 10: Draw straight lines from the ends of Line 6 to the top corner of Panel "F."
Step 11: Draw the box that makes Panel "A," centering it in Panel "B." This should leave one inch above between Panel "A" and Lines 1 and 3.
Step 12: Draw a box inside Panel "F" by drawing straight lines 1/2 inch INSIDE the lines the make up Panel "F." The newly drawn box will be one inch smaller than Panel "F." The area between the two boxes is panel "E."
Step 13: "SCORE" the lines that outline Panel "E" (Lines 2 and 3 and the vertical lines connecting them). "Score" means to cut the paper ON THE TOP SIDE OF THE FOAMCORE ONLY! Do not cut all the way through1
Step 13: CUT (all the way through both sides of the foamcore) lines 1, 4, 5, 6, 7 and 8. I.e., cut the outline of the shape above completely out of the sheet of foamcore. Also CUT out Panel "A."
Step 14: Bend panels B, C and D back until their outer corners touch. This will make the basic shape of the foamcore box.
Step 15: Tape the unattached seams of the softbox together. I.e., tape together the parts of panels C, D and E that touch.
Step 16: Making sure that the box is now firmly taped together, either cut out panel "F" or completely cut panel "E" out of the softbox. I leave this up to you. The softbox will be a little stronger if only the inner box is cut out, leaving panel "E" in place.
Step 17: Do one of the following:
(a) if you are in a hurry, put the softbox on top of your flash unit and drop a kitchen garbage bag over the softbox and flash (making a weather proof softbox unit!) and tie off the kitchen bag under the flash unit; or,
(b) Cut out a piece of white plastic sheeting (like from a white kitchen garbage bag and tape it over the face of the softbox. Add another sheet if this does not provide enough diffusion.
Back to hummingbird photography page.