|
|
 |
|
|
|
|

|
|
|
|
|
|
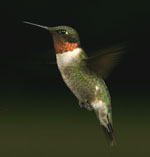
The
Hummingbird Photography
Quick
Start Guide for Digital Cameras
|
|
|
|
|
|
STEP
1: Gather Equipment
Hummingbird Feeder
Anything that consistently draws hummingbirds is
acceptable, including a tree or bush. If you are using a
plastic feeder and want photos of flying hummingbirds,
remove the perches even if you have to cut them off.
Remember, flowers don't have perches either. I get the best
results from the flat style feeders that can be supported
from the bottom. When the support is on the bottom of the
feeder, it doesn't get between the camera and the bird.
Digital Camera
If you are new to this and aren't well versed in studio
lighting, use a digital camera. It will make life so much
easier than film. As a practical matter, if you want high
resolution and high quality images, you will need a digital SLR and
a high quality 200, 300 or 400mm lens. A 400mm lens with a
minimum focusing distance of 10-12 feet is
optimum unless you want to purchase a miniature blind.
Chair or stool
Because you will have to keep still for long stretches,
it's best to be comfortable. I have taken photos while
leaning against a building, but prefer a chair.
Monopod or Tripod
With a digital SLR with a 400mm f/5.6 lens attached, you
will need a support to keep the camera in shooting position
for long periods of time. This is probably true of any
camera. If there are lots of hummingbirds, then you probably
won't have to wait long and can probably do without a camera
support. I always use a monopod with a small tilt head
attached.
Hot Shoe Flash Unit
Unless you are photographing hummingbirds in direct
sunlight, you will need a flash. Get a unit dedicated for
your camera that has a guide number of 120 or so. The guide
number is an indication of how powerful the flash unit is.
On-camera flash is not really powerful enough to give you
consistently good results without the camera setup that I am
recommending.
Flash Extender
A Better Beamer or other flash extender will usually give
you an extra stop or two of flash power. It is extremely
helpful when using the "high speed sync" feature
of a dedicated hot shoe flash. A flash extender will not
work with your camera's built-in flash.
|
|
Step
2: Find Location
Though I haven't really discussed this elsewhere, this is
probably the most important consideration to success. You
need a combination of things in a location. First,
hummingbirds must like it and be willing to feed there. It
should afford shade to the feeder (and to the photographer if
it is hot out). The background should be either pleasant or
far away so that it will be out of focus. It should allow
room for the convenient placement of a chair at an
appropriate distance. And it should allow for the placement
of a flat feeder that can be supported from the
bottom.
If you are not using off-camera flash, the location
should be in the shade of an upright object and have a clear
view of the sky.
|
|
Step 3: Setup feeder and chair
Your feeder should be set up so that
it is 4-6 inches below eye-level of your shooting position.
The basic idea is that you want your camera to be at the same
height as the hummingbirds that you are shooting. If you are
sitting in a chair, this will be somewhere in the vicinity of
3-4 feet or so, depending on your height and the height of the
chair. Setup and leave this feeder in this position
permanently if possible. Let the hummingbirds become used to
the feeder in that location even when you aren't photographing
them.
Take down your other feeders before
starting your session. Yes, the hummingbirds will feed at the
furthest feeder from you if you leave them up.
Set up your chair so that your camera
will be about one foot beyond the minimum focusing distance of
your lens at its longest focal length. Test this by sitting
with your camera, if you have a zoom lens, set it at the
maximum magnification and find the location where is will just
focus on the feeder, then move back 12 inches or so.
An interesting way of accomplishing the set up in a
comfortable way is to shoot out the open window of a building.
The building will then double as a blind. You can even close
the curtains, just leaving enough room for the camera lens to
point and flash to shine through. My first hummingbird setup
was done this way. However, close the window when you are done
with the shoot so no hummingbird flies into your house.
|
|
|
Step 4: Watch for hummingbirds
If you are certain of the
omnipresence of hummingbirds at your feeder, you can skip this
step. Otherwise, don't waste your time sitting motionless in
your chair. Get your camera equipment together and keep and
eye on the feeder. After you see a hummingbird feeding,
chances are it will be back in about 15 minutes or so. So once
you see a subject, move on to the next step. If you don't see
one, put your other feeders back up and try again tomorrow.
|
|
|
Step 5: Sit down, set up and Test Camera Settings
This is where the digital camera
shines. When you sit down to wait for the hummingbirds, take
the time to snap a few shots of the feeder to test exposure at
your chosen settings. As you photograph the birds, you will
develop favorite camera settings. If you're not sure, start
with the following:
Direct Midday Sun (without flash):
ISO 400, Shutter 1/500, f/16
Shade (with flash on high speed
sync): ISO 400, Shutter 1/1000-1/1600, f/11
Shade (with normal flash): ISO
200-400, Shutter on Max flash sync, f/16
Start with these, take a few shots of
the feeder and change the ISO or aperture to get the exposure
level you want. When using flash, close aperture and/or lower
ISO to darken the background and use -1 to -2 stops flash
exposure compensation if your camera or flash supports this
feature.
|
|
|
Step 6: BE STILL and wait for hummingbird to
return
I grew up learning to hunt at a young
age, so this part came easily to me, but it cannot be stressed
enough, BE STILL. This is where a monopod or a tripod
will come in very handy. The camera needs to be in shooting
position. If you wait with the camera in your lap or hanging
on a neck strap and then put it to your eye when the
hummingbird gets into position, you may have made your wait a
waste of time by scaring the hummingbird away with your
movement.
Sit in your shooting position and be
prepared to sit for 30 minutes to an hour. My most productive
sessions have lasted two hours or more during which I have
taken up to 50 shots during 5-6 separate visits to the feeder
with 15 minute waits in between.
|
|
|
Step
7: Photograph Hummingbirds
What you will probably notice first is the hum of the
hummingbird's wings. Don't look around for it, keep your eye
on the prize, the feeder. That is where the hummingbird is
going so be patient. When the hummingbird first approaches the
feeder, focus on it, but don't shoot yet. Let the hummingbird
sip the nectar first, then when the hummingbird pulls out of
the feeder and backs up a little, shoot.
It has been my experience that hummingbirds aren't all that
skittish, but they will go away if there is a large amount of
movement near the feeder or if they are flashed before they
get a sip of nectar. Once they know the nectar is there, they
are more tolerant of the flash. If there are numerous
hummingbirds competing for the feeder, your movement and
activity is less of a concern.
|
|
|
What if you don't
have a 400mm lens or a digital SLR?
Hummingbirds will tolerate your
presence very close to the feeder if you remain still. The
following photograph was taken while I was standing within two
(2) feet of the feeder trying to use a wide angle lens to get
multiple hummingbirds in the photo.
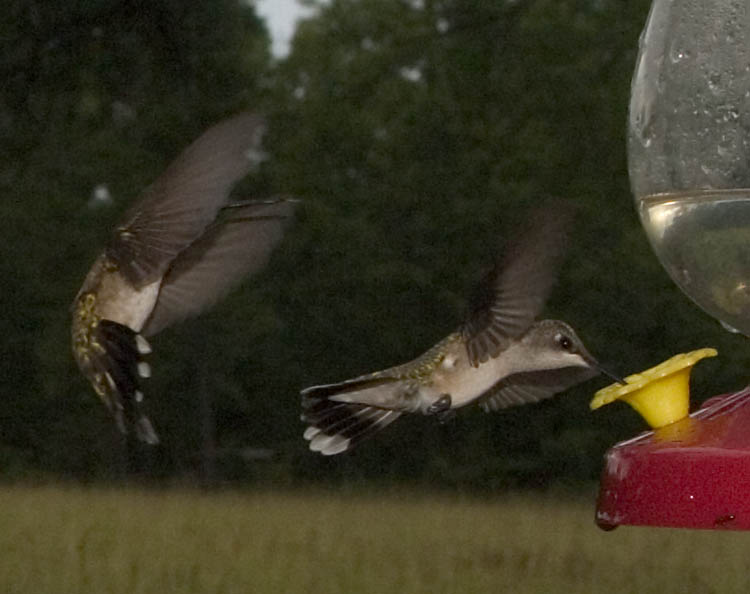
The above example is clearly not my best
photo. It was taken with a 15-30mm lens and hot shoe flash in
dark shade, just before a rain storm. These birds were no more
than 20 inches from my camera. I was still and held my camera
in position for about 15 minutes with no camera support.
So if you want hummingbird photos with a point
and shoot digital camera or a fixed lens digital camera, just
zoom the lens out all the way, stand real close, be still and
snap away. You won't know if you can get a decent shot unless
you try.
|
|
|
|
|
|
|
|
|
|
|
|
|
|
|
|
|
| |
|
|
|