|
|
 |
|
|
|
|

|
|
|
|
|
|
Tips
& Tricks
|
|
|
|
|
|
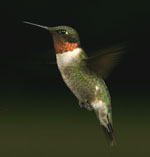
1. How to
get the bird's good side
First, you should only have one feeder out when you are
trying to photograph hummingbirds. If you are trying to
photograph hummingbirds in flight, it should have no perches.
Finally, you should dictate the birds pose by plugging all the
holes in the feeder except the one you want the bird to feed
from and then rotate the feeder to get the desired position.
Sorry Mr. Hummingbird, I want your left
side.
Grass, leaf stems, toothpicks, flowers, tape.
Don't let the bird dictate your composition unless you just
don't care about the angle.
|
|
|
|
2. How
to get that perfect shot while feeding at a flower
Hummingbirds can move frantically between flowers. To make
them stay at the right flower, that one you pre-focused on,
that one where the birds angle and the light will be just
right, put some nectar in it. Yep, add a little sugar water.
The easiest way to do this is to go to a veterinary supply
store and buy a syringe used to vaccinate dogs or large
mammals. Grind or file the sharp point off, fill it full of
sugar water and dispense some into the flower you want the
hummingbird to drink from. When the hummer gets to that
flower, he will usually stop and sip a while, giving your lens
enough time to get good focus and giving you enough time to
get a few shots. This method can also be used to get
hummingbirds to visit certain flowers more often, in case they
have been neglecting your photogenic hibiscus in favor of your
butterfly bush.
|
|
|
|
|
|
3.
Dammit, move away from the feeder!
If a bird sticks his beak in a feeder and won't move, go
ahead and shoot once. The flash will usually make the bird
"back up" to see what is going on. Then snap again.
|
|
|
|
|
|
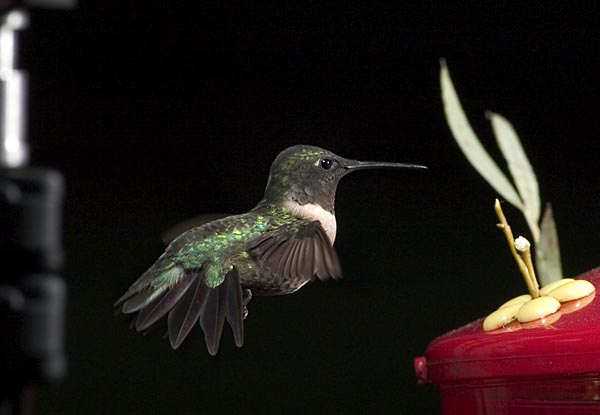
4.
Sip, back up, hover, repeat
This is the pattern that most hummingbirds repeat at the
feeder. Learning to anticipate it will allow you to get shots
of the flying hummer without its beak in the feeder. If you
get really good or lucky, you can get decent shots as the bird
makes a mini dive to go back to the feeder.
Luck
Learning the birds patterns will make you
realize that you can get the bird in focus in more positions
than perched or with his beak in the feeder.
|
|
|
|
|
|
5. How
to get shots at a flower when you don't have flowers growing
nearby
Hang a flower pot near where you usually keep your feeder
(or put one on a stool) and use the syringe method to put
nectar into the flowers or hang a long tube with a feeding tip
that comes out just behind a supplied flower and photograph
the bird feeding from the unseen tube.
|
|
|
|
|
|
6. How
to get real close and stay comfortable
Get an "outhouse" type
portable blind (also called a "hide"). I own one that was manufactured by a company
called Ameristep. This blind can literally be set up in about
1 minute with the anchors or about 10 seconds without (you can
literally throw it up in the air and it will be open when it
lands). Place it between the feeder and the sun in the late
evening and you won't even have to worry about the feeder
being in the shade. I use the blind when using a 200mm lens to
take images from about 36 inches away from the feeder. The
only thing visible from the blind is the lens.
Make sure and put the blind up at
least a day before you take the photos so the birds will be
used to it being there. Leave it up as long as the birds stick
around if you can get away with it. I leave mine up for a week
at a time.
Motion is what startles hummingbirds.
They will tolerate sound more than most people think. I have
carried on normal volume conversations while photographing
hummingbirds with no reaction from the birds. But if I move,
the bird will usually take notice. If I am in a blind, I can
scratch my nose, stretch or make any movement I want to and
still not startle the birds.
BUT, PLEASE NOTE, IF YOU KEEP STILL,
YOU DON'T REALLY NEED A BLIND.
|
|
|
|
|
|
7.
Backgrounds
My most consistent problem is getting a good background.
Since the background is out of focus, you can simply paint any
background you want onto poster board with spray paint and use
a separate flash to illuminate it. Orange flowers and green
background, no problem, Krylon makes those colors and since it
will be out of focus anyway, a green poster with not-too-neat
orange blobs will do just fine.
Another method is to set up your feeder about 3 feet in
front of your favorite plant.
|
|
|
|
|
|
8.
Keep yourself and the camera still with a monopod or tripod
Invest in a sturdy monopod or tripod, I use a monopod. This
will allow you to keep the camera at your eye for hours on end
and will be helpful whether using a blind or not. If you let
the camera hang from a neck strap and bring it into position
when the hummingbird flies up, you will miss shots.
|
|
|
|
|
|
9.
Solution tweaking?
This is one that I have heard, but cannot substantiate.
Some claim that the more dilute the solution, the more
frequent a hummingbird will visit the feeder. The more
concentrated, the less often the bird will visit.
I have read a lot of articles about this. The most
interesting I thought pertained to a man in Michigan who
attracted more hummers than any other known person in the
state. In fact, his home was used by a researcher because of
the number of hummingbirds that fed there. The solution he
used? 7:3
I have never mixed nectar that strong. My aunt claims wild
success with 3:1. I have heard of people using a 2:1 solution.
I use somewhere between 4:1 and 3:1, tending a little closer
to the latter.
You will probably eventually read that anything but 4:1
will cause instant death to hummingbirds. Do not trust people
who claim anything of the sort. Hummingbird watchers are a
very superstitious breed.
|
|
|
|
|
|
10.
Don't shoot 'til you see the whites of their eyes . . .
Don't be impatient. When the
hummingbird approaches the feeder, let it sip once before you
snap. In my experience the hummingbird will be a little more
tolerant of your flash if it has already hit paydirt. Also,
wait until focus is correct and the bird is in full view.
Remember, each flash has the potential to make the hummer end
his visit. He will come back, but if you continue to scare him
with flash before he drinks, he will give up on the feeder.
If you aren't using flash, shoot
away.
|
|
|
|
|
|
11.
How to waste your time
There are a number of ideas that I often see from
beginners. Some of them are based on assumptions that are
probably incorrect; other ideas are just not that well thought
out in my opinion. Here is a list:
-
Use of a "Remote."
On film cameras, a cable release, and on newer cameras, a
remote shutter release, are primarily used for photographs
where vibration reduction is very important, such as
landscape photography, for long exposures or when using
very long focal length lenses with shutter speeds that are
less than one divided by the focal length of the lens. For
photographing hummingbirds, the only well-focused
photographs that you will likely get of a hummingbird will
be of one sitting at the feeder because the lens will have
to be pre-focused on a fixed spot. I think that the
reason that people want to use a remote release with
hummingbirds is so that their presence, close to the
feeder, won't prevent the birds from feeding. For this
purpose, a remote is simply unnecessary. As long as you
remain still, birds will feed even if you are within a few
feet of the feeder.
-
Building an extravagant
blind. Blinds are necessary only to hide your motion from
hummingbirds. If you can remain still, you don't need a
blind. If you want a blind, the cheapest one you can find
will probably do.
|
|
| |
|
|
|